Contributing to the diversity of a minor

So, now you know that the minor scale is related to the major scale in that it uses the same notes but starts instead on the sixth. And you know, from your playing, that the minor scale is used a great deal. Although in modern western music the minor scale is considered dark, sad, lamenting, etc. earlier in western civilization the scale was considered happy. Things change.

The minor scale remains a very useful convention. But what you might not know is that one of the things that the minor brings is diversity – there are a number of minor scales.  Yikes! But with a little bit of explanation, you’ll soon understand (and be able to use) the different types of minor scales.

First, there are different minors! And there are terms that can be confusing. But once you get the lay of the land, you’ll be able to participate in those high-falutin’ music conversations with anyone!

There are the relative minor, the natural minor, the parallel minor, the harmonic minor, and the melodic minor. First off, it’s not as complicated as it sounds. Sort of like the Future Perfect Continuous Conditional verb tense – it sounds terrifying but you use it all the time (I would have been practicing…). Like last week, now, we’re just learning the formalized rules. So, here we go! We’ll work from C major (again, because with no sharps or flats, it’s easy to see and write). 

Relative minor. On the harp this is the easy one. Start at the root of the major scale and walk your way to the sixth of the scale. If you’re lazy (and flexible), you’ll just go down three (in our example, from the C go down to the A) and start the scale from there (of course, you can also go up to the a above and start there). Because you’re clever, you’ve already figured out that this is the Aeolian scale that we talked about last week. The intervals in this scale are: W(whole), H (half), W, W, H, W, and W and the notes of the scale are A, B, C, D, E, F, and G. This is also referred to as the Natural minor. 

Parallel minor. This minor scale is “parallel” because it starts on the same note as major scale in consideration. In our C example, the parallel minor starts on C – so you can already see that something else will have to change – we are going to have to engage some levers. The intervals in this scale are W, H, W, W, H, W, and W, while the notes of the scale are: C, D, E♭, F, G, A♭, and B♭. You’ll see that the key signature has three flats. Let’s think that one through. That means that this is the relative minor of E♭! 

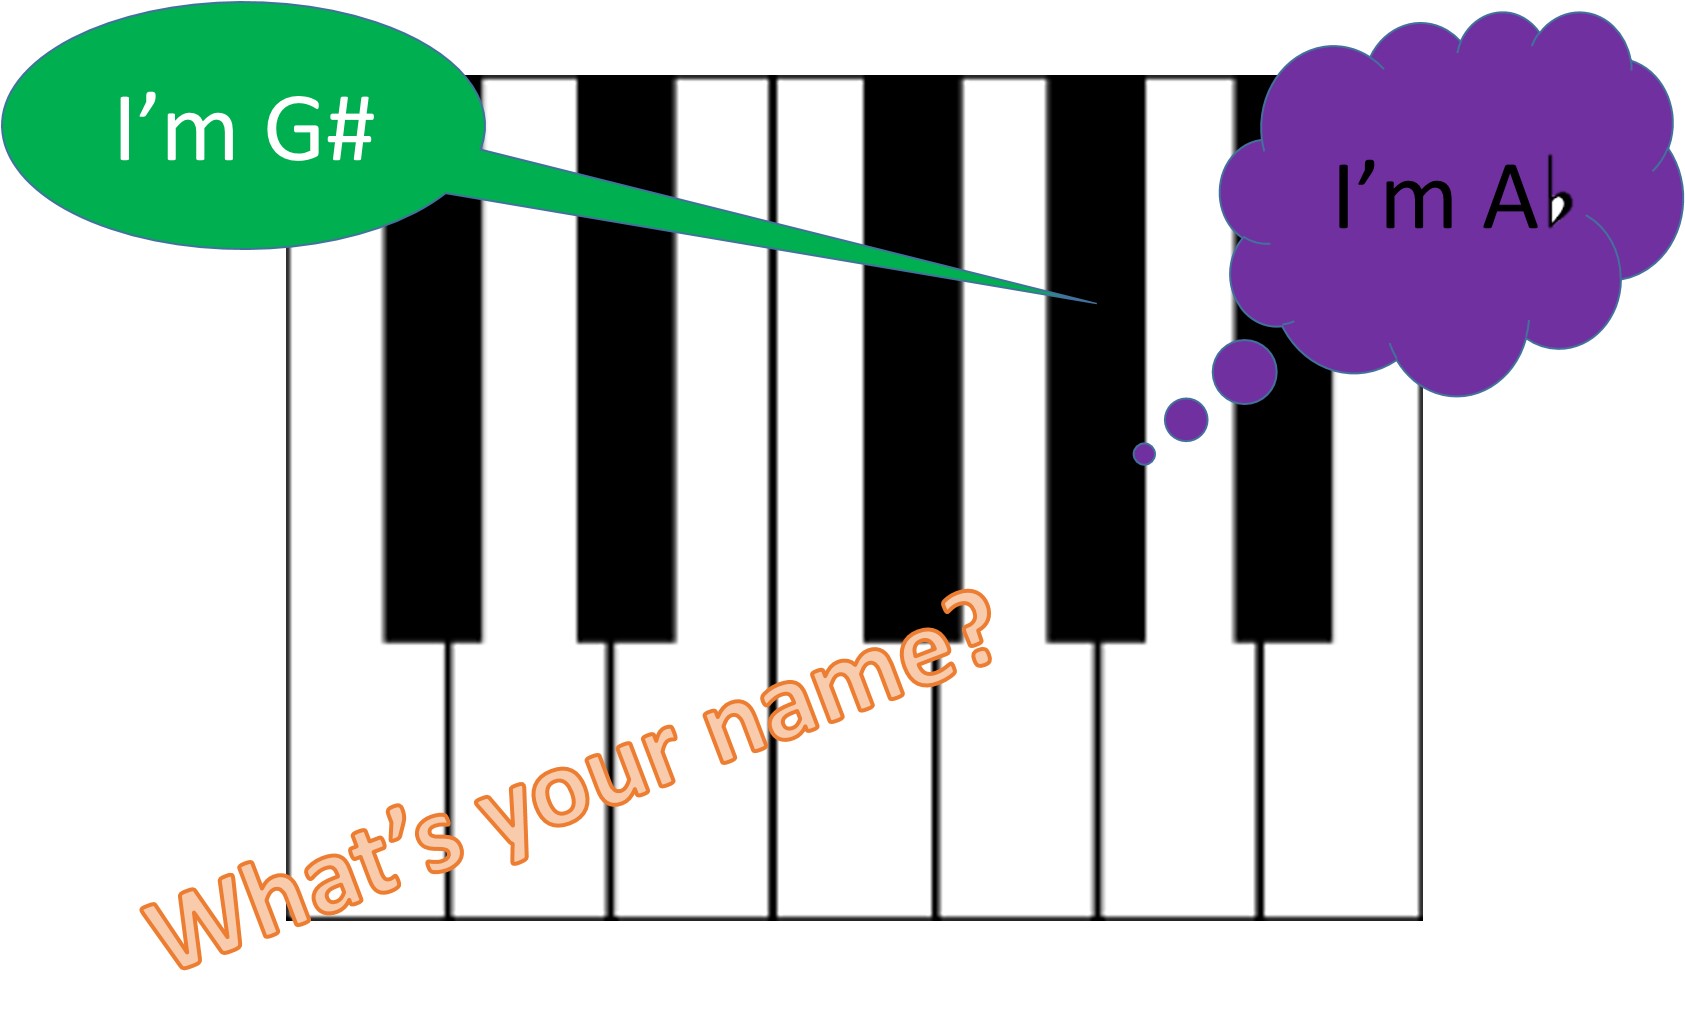
Harmonic minor. This scale is close to, but different from, the relative (or natural) minor. In this scale you raise the 7th up ½ step. The intervals are W, H,W, W, H, W+H, H (you can see the “big jump” going to the raised 7th).  In our example working from the C major scale, the notes become A, B, C, D, E, F, and G#. This scale allows you develop some delicious harmonies when you use it to build up the chords for the scale. 

Melodic minor. Ok, there’s no way to dress this one up – it’s a little bit challenging to understand and to remember because going up the scale is different than coming down!  Except when it doesn’t. It is often expressed that for the melodic minor, on the way up the scale the 6th and 7th are raised. But on the way down, scale goes back to “normal” (with the 6th and 7th lowered). In this case the intervals are W, H, W, W, W, W, and H on the way up and W, W, H, W, W, H, and W on the way down. For the A minor scale, the notes would be A, B, C, D, E, F#, G# on the way up and on the way down, the scale is A, G, F, E, D, C, and B (you’ll see that it goes back to the natural minor). Of course, some of the weird comes because sometimes the scale is the same up and down. You might hear that this is a jazz scale – and it is, but it is also quite present in classical music as well. In addition, you might find that sometimes this scale is played the same in both directions. I told you it was a bit challenging.

Play with these scales. Really give them a working through so that you can find what you like and what you think you can use. The diversity in these versions of the minor scale will give you plenty to work with as you work through tunes and as you develop arrangements – you’ll be delighted with the things you find!

In the Mode – Useful theory

Ok, first, let’s be honest – simply saying “Music Theory” in a room may cause you to come out with no friends. Most people don’t like theory. They don’t understand theory. They probably don’t actually know anything about theory, but they have heard the stories…and those stories are terrifying!

But really, theory is just a way to have a common language to talk about music. Think of it as the “English Class” of music. It’s where all the rules and conventions are held so that you don’t have to find out the rules every time you use them (or abuse them). And, of course, if you’re a rule-breaker, that’s bad. But if you know the rules and elect to bend them, that’s avant guard!

So, knowing the rules becomes a first step. You don’t have to learn theory by sweating over a badly written book. In fact, some of the best theory lessons can come right at your harp. But you’ll be faster at learning all the rules if you use a mixed approach of reading about it and sitting at your instrument and exploring.

Melody is one of the basic elements of music.  Melodies are built from scales. So, it can only help to know what the scales are. This is where some of you will be shuddering – because you know I’m about to talk about…modes (dun-dun-duhhhh).

The modes have a rich (and depending on who you read, varied) history. Much of this history is interesting. And it doesn’t seem to have much to do with music today. But we do still use the names.

Modes are not really that mysterious. They really are just variations of a scale. Let’s work in C for this example (everything will be applicable to any scale – but C doesn’t require a lot of #s and bs!).

Think of what we call the C Major Scale. It consists of: C D E F G A B. The relationships of the interval are either whole steps (W) or half steps (H). Therefore this scale is: W W H W W W H and it is called the Ionian mode.

BLAHBLAHBLAH, yeah, we know that.  This is a good time to bring your harp in so you can play along at home.  If you have a piano (or keyboard or piano app) this might be easier to visualize.

So, if you started on the D instead, now the scale is: D E F G A B C and the interval relationships become W H W W W H W. It’s a totally different sound – and it’s called Dorian. It sounds sort of “jazzy”.

And if you started on the E, now we’re at E F G A B C D. The intervals are H W W W H W W and we call it Phrygian. This scale sounds a little dark.

Starting on the F we get: F G A B C D E and the intervals are W W W H W W H which gives us the Lydian mode which is pretty peppy.

If we begin on G the scale becomes: G A B C D E F and W W H W W H W. This is the Mixolydian mode – and for those playing Scottish and Irish traditional music, it probably sounds very familiar – it has the flatted 7th that we’re so used to hearing.

By starting on the 6th we get: A B C D E F G with intervals W H W W H W W. This may also sound hauntingly familiar – this is what we usually call “minor” – it is the Aeolian mode.

The last mode is the Locrian – it begins on the 7th: B C D E F G A, and the intervals are: H W W H W W W. This mode is just weird (to us) and you don’t hear many songs in that scale typically because it doesn’t resolve which we don’t really like in western music (of course, other cultures have different scales and many include “unresolving” scales that we might shy away from).

No one scale is “better” than another, although you might prefer the sound of some over others. And that’s ok – music is a cultural thing so what you’re used to will likely sound better to you than something that is new and different.

Spend some time on your harp playing with these scales – see what you like. Keep at it and see if what you like changes over time, as you become more familiar with the sounds of the “different” scales. Once you get used to hearing and thinking about these, you might be more inclined to look for them or to use them. Later we’ll talk about the chord progressions that might set these different scales off if you use them for a melody. Keep practicing and the theory will work its way into your brain!

Give it a new twist

When you learn a new tune, there is a lot to learn and to remember. You are trying to keep a lot in mind as you play – what are the notes of the melody? What are the needed dynamics? What about the phrasing? And then there’s the accompaniment and harmonization!

You may recall that I am a big advocate for laziness and efficiency. To that end, I try very hard to reduce the amount of stuff I have to learn, memorize, recall, and reproduce. So it becomes essential to create a set of tools that allow you to wring the most playing and performance time out of each tune you learn.

One of my favorite tools is to stick to a basic chord progression – with a twist! What is the twist? Inversions!

Inversions

Not sure what an inversion is? It sounds complicated, but inversions are only a twist on a chord.  And with a little bit of practice, inversions can become second nature.

How do you play inversions? Here’s an easy tutorial:

  1. Place a root position C major chord*. [Lost? The root position is the 1 – 3 – 5 chord with the scale name on the bottom (in our example here it is a C – E – G chord). This is the Root.]
  2. Now, twist that C off the bottom of the chord and place it on the top (so now you have a chord in the shape E – G – c) – that’s the first inversion.
  3. To move to the second inversion, take that E off the bottom and twist it to the top (so now you have a chord in the shape G – c – e) – that’s the second inversion!
  4. And, you guessed it, one more twist and you’re back to the root chord, just up an octave!

As you play along (I know you rushed right over to your harp while you were reading!) you can hear that, while the chord is the same, each inversion is also different.  These differences meant that the inversions each give the tune a slightly different character!

Work on your inversions – practice them so they become second nature – and use them make subtle (but easy to remember) variations to your harmonies for the tunes in your repertoire and watch your repetitions become more interesting!

*I’m using the C major chord here but this applies to chords in any key – once you learn to do them, you can use them all over the place!

Make a move: Tranposing

One of the skills musicians need (for a whole lot of reasons) is the ability to transpose tunes. Transposing is when you move from playing a tune in one key to playing it in another. For instance, If you have learned to play Happy Birthday in the key of D but when you go to the party everyone else is playing it in C – you either have to transpose it or you have to sit out. And who wants to do that? No one, that’s who!

So, it is clear that being able to transpose is fairly important. It is also somewhat intimidating to learn to do it – typically because we wait until we’re at that party to give it a try…and we know that everyone else can hear us either playing in the wrong key or desperately searching for a tune we already know in a key we never even thought to play in!

Tranposition

But, how do we learn to transpose?  Well, you already know – we practice! And as usual, I suggest a small steps approach:

  • Play the tune in the key you know. Might as well build up a little confidence to get started.
  • Next set your levers to the next key down (for instance if you always play a tune in D, with two sharps, you’d move into C with no sharps).  Now play the tune just one string down from where you normally play it. This is one of those times you’re going to wish you played without looking, because almost every time you make a mistake it will be because your eyes are getting in the way.
  • I also suggest you just worry about getting the melody. Give yourself a break and just get the tune down first.  Add the left hand later.
  • PRACTICE doing this – at first, focus on a single tune. Work on playing it on the new key. Eventually transpose the left hand too (same thing, move down one, be gentle with yourself).
  • Once you’re comfortable in the new key, work on moving back and forth between the two (yes, this is a little kludgy, but it works to get you confident and solid on both keys!).

Once you feel comfortable going between these two keys, you can practice transposing all the tunes you know (well, you know that might be a little bit of hyperbole – but practicing will make it easier and you will get better at it). Then you can also move to bigger jumps (for instance moving from G to D) which will strain your brain a little but will be easier if you have practiced the smaller moves.

So, keep practicing your transposing and soon it will be so second nature you can do it on the fly at all the birthday parties!

Is that a full stop?

If you’re going to improve your music reading, you have to know what all the ink means!  So, let’s start with the . Yup, that’s a dot – a .

Nope, it’s not a full stop – in fact it means the complete opposite – it means add half again.

No matter what the note is, the . gives you half again as much.  Got a quarter note, add a . and then you have 1 and ½ beats.  Got an eight note, add an additional sixteenth note value.  Got a half note, add half its value – an entire beat.

Picture1

When you’re reading a piece of music, these . become very important.  They can be easy to overlook because they are small and there can be a lot of information on the staff, but they become very clear when you count the beats in the measure.  I know you’re counting each beat in every measure so you would know right away if you missed any of the .’s!  If, while you’re counting (including the .’s), you have too many beats (or not enough beats), you know right away that you need to go back and reread the measure.

Like reading words, at first finding the dots, remembering what they mean, and counting them out will be painful and will require painstaking attention and reading.  But with a little bit of work each day you will become a better reader!  Given enough time and practice, when you look at a page of music, you’ll know what to do with all the .’s!

Brain work – Enharmonics

No one likes to learn theory. No one even really likes to think about theory. But one of the important things about theory is that it helps you build a vocabulary that you can use to talk with other musicians…and actually understand what they’re talking about.

And the words shouldn’t be the way we differentiate ourselves from one another, but often that is what happens – someone uses a word that sounds like you should know what it means but you have no idea what they are talking about! So, here’s the first of these – just so you can stay in the conversation!

So what are Enharmonics? Enharmonic is the word used to describe two notes of the same pitch that have different names. This is easier if you look at a piano –

Picture3For example – if you look at the right black key in the set of two – you can call this D# (if you are in the key of EMaj) but might also call it Eb (if you are in the key of B Maj). They are the same sound (this is not entirely true – if you’re interested we can address that later – but for our purposes, they are the same sound) but have two different names.

If you have your harp tuned to Eb Maj, you can either leave the A lever down (to have an Ab) or you can lift the G lever (to have a G#). You’ll get the same note (assuming you have tuned correctly!). The challenge is to remember what string to play when!

Enharmonics allow you to have both notes (either G or G# and or Ab and A#). Note that, unlike the piano, you can’t have both without flipping levers. And that’s ok – as long as you plan ahead!

You’ll get better at using enharmonics to get more out of your harp if you practice reading the music and “translating” the notes in your head as you play.