Boot Camp Week 5 – Five Weeks to Better

Well, you made it – Week Five of Boot Camp! You should be proud of yourself and your hard work. This gives you a foundation to keep building your practice and to refine it to meet your needs. Those needs will likely change as you develop as a harper, but the fundamentals stay the same. So, keep at it and finish strong!

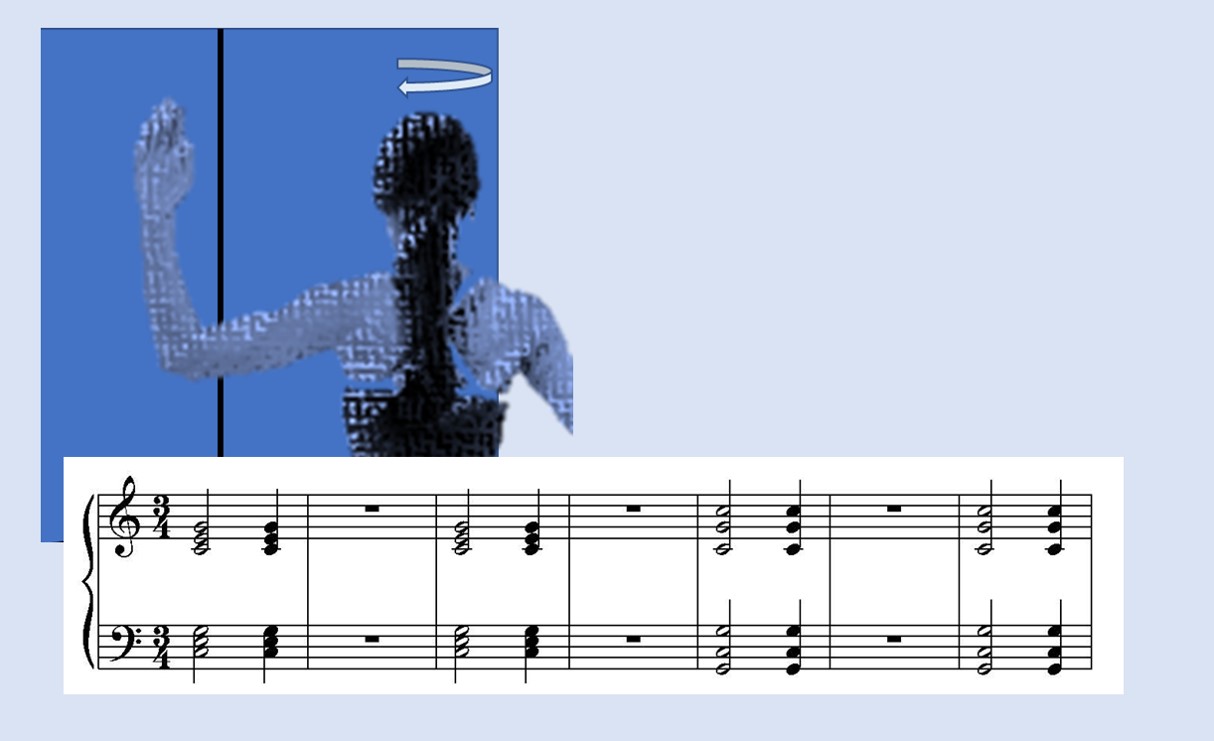
Stretch – Small Shoulder Rolls are relatively easy, but because we use our shoulders more than we know, you might be tighter in the shoulder than you’d expect.* Begin by sitting (or standing) upright, head up, shoulders down. Place your right fingertips on your right shoulder and your left fingertips on your left shoulder with your arms in front of your chest. Your elbows should be close to your waist. Now, rotate your arms to the outside and “draw circles” with your elbows. Keep your head up. Take your time – go slowly and carefully. If your shoulders are tight, this may be challenging. Repeat three to five times. This stretch can be performed before, after, and during your practice.

Technique – Dall-ing. Not Daaaahl-ing, Dall-ing.  Don’t roll your eyes, I can make up words if I need them! Dall is the Gaelic word for blind – and if the harpers of old could play without seeing, you can play without looking. Yes, it can be scary but, as with everything – if you practice it, you will get better at it. And since most people are primarily visual, giving your other senses a chance to be in charge will change your perspective and will improve your playing whether you’re looking at the harp or not. To practice Dalling, simply close your eyes – and keep them closed! Start by playing scales – make your initial placement and then close your eyes and play. Pay attention – where are your arms? Where are you stretching? How far do your fingers need to move? Once you’ve got that down (and after all – you’ve been playing scales – they’re so easy you can do them with your eyes closed!) move on to the intervals we did in week one (first left hand, then right hand, then hands together). And once that’s easy, move on to playing tunes you know well. All the time you’re playing, you are training yourself to listen, to feel (the strings on your fingers, the harp in your arms, the stretch or bend in your elbow) all those things tell you something about where you are on the harp. Don’t get discouraged – you can do this!

Practice Element – Taking the time. We are all busy. And we sometimes have difficulty cramming all the things we think are important into our days. And its easy to let practicing slip away. Or to get time, but to give our practice short shrift by just playing and not doing mindful work. All of those get in our way. Start by being honest about when you will practice and how much time you have practice. Do not get impatient and want to be able to play something immediately, if not sooner. Or get wrapped up in the illusion that someone else is performing better, faster, stronger than you are. Or be confident that you’re not getting any better. Acknowledge what that amount of time will mean to your in terms of how fast you will be able to prepare new material – and accept that. work from where you are, with what you have to achieve what you want. Give yourself the time to make things happen – in your own time.

Boot Camp – Five Weeks to Better is coming to a close. But the work continues. Keep practicing – do the things that help you move forward and enjoy the journey. At this point, you’re ready to take on the summer! Enjoy it – and let me know what you do and how this Boot Camp helped you be prepared!

*Remember that I’m not that kind of doctor, so please be careful, work within your own abilities (which isn’t to say don’t stretch yourself but also, don’t hurt yourself!). Be careful and only do what you can do. This blog pro­vides gen­eral infor­ma­tion about trying to stay health and other sub­jects related to playing the harp. All the con­tent pro­vided in this blog, and in any linked mate­ri­als, is not intended to be, and should not be con­strued to be, med­ical advice. If you have a med­ical con­cern, con­sult with an appropriately-licensed physi­cian or other
health care worker. Never dis­re­gard pro­fes­sional med­ical advice or delay seek­ing it because of some­thing you have read on this blog or in any linked materials. If you think you may have a med­ical emer­gency, call your doc­tor or 911 immediately. The views expressed on this blog and web­site have no rela­tion to those of any academic, hospital, practice or other insti­tu­tion with which the author is affiliated. Don’t be thick – these are just suggestions – take care of you!

Boot Camp Week 4 – Five Weeks to Better

If building a habit takes 21 days, then you’re on your way to a solid practice habit. And although sometimes it can feel like liver and durian on the same plate, you know it’s good for you – so stick with it – we’re almost there!

Stretch – Hand yawns: Few things are as satisfying as a good long yawn. It looks funny – but it feels good! These we’re going to spread that satisfaction to your hands. These are a fun, quick, and can be done just about anywhere. Start with your hand closed, fingers together. Take a deep breath. Now spread your fingers as wide as you can.*  Reach with each finger. Hold your hand open like that for 5 – 10 seconds. Keep breathing. Do each hand 3 – 5 times. Fully relax your hand between stretches. You can do this stretch before and/or after your practice, while you’re on the phone, while driving (of course, don’t let go of the steering wheel!), or while waiting in line in the grocery – the possibilities are endless.

Technique – Lever changes: You might not think about lever changes as needing a lot of practice, but because they are relatively infrequent, you do need to practice doing them efficiently and smoothly. Making a lever change needs to be like all the other movements you make – on time, quiet, accurate, and consistent. Let’s focus on the left hand because, while you can do right hand lever changes, you will want to avoid those as much as possible! Today we’ll focus on changing a single lever. The same process occurs when you modulate or change a lot of levers at the same time). We’ll do this in ¾ and you’ll play a note, engage the lever, play a note, play a note, disengage the lever, play a note – try that until you get the hang of it. Then you can work on playing this exercise:

In effect, you start in C tuning and by the end you have moved yourself to D tuning. Move carefully and deliberately.  In the left hand, (beat 1) play the D, come off and (beat 2) engage the lever, (beat 3) return to the strings and play the D.  You can do any key you like – remember we’re only trying to change one lever.  Go slowly at first.  Be careful, stay in rhythm, be accurate (get the right lever!), and be thorough (fully engage the lever).  As you get more comfortable, pick up the tempo, but do not accept sloppy.  As you get the hang of it, you can move on to modulation (changing from one key to another – in this example, changing all the Cs and Fs on the harp – but get changing one down before you try that!).  Once you get the hang of it, it’s easy (but still takes practice).

Practice element – Counting: Counting is essential. No matter how you feel about it, music is applied mathematics, so whether you’ll admit it or not, you should always be counting. And although you’ve been counting since you were young, you s-t-i-l-l need to practice counting your music. The challenge is to have enough spare mental capacity to ensure you are counting even when things are tough. And, lest you think that all the harp hero’s you’ve watched on stage aren’t counting – fie – they just have way more practice than you, so they are at the end of this paragraph – and you might be right here àStart by counting aloud. No really – out loud – so everyone can hear you. You might notice that this is difficult. It’s hard to talk (count out loud) and play and think about what comes next and everything else! And it won’t get any easier unless you practice it. When you can count out loud while staying on tempo and on rhythm and while playing the right notes, then you can, as always, pick up the tempo a little. And as always, when you fumble, slow down and work it some more. When you can play and count out loud successfully, then you can move to internalize your counting more. This is more challenging than it sounds – the next step is to say the numbers without saying them out loud – still a bit of extra work. From there you can verbalize the counting inside your head (and yes, you should still be able to “hear” yourself counting, only now, you’re the only one who can hear it!). This can be a slow and painful process, but it’s so worth the work.

We have only one week remaining in this summer’s boot camp – one more week to work hard to be ready for all the summer fun that awaits – hope you’re finding it useful and as always, I’d love to know how you’re coming along, what was helpful, what was hard to follow, and how you are noticing improvement in your practice and playing!

*Remember
that I’m not that kind of doctor, so please be careful, work within your own abilities (which isn’t to say don’t stretch yourself but also, don’t hurt yourself!). Be careful and only do what you can do.
This blog pro­vides gen­eral infor­ma­tion about trying to stay health and other sub­jects related to playing the harp. All the con­tent pro­vided in this blog, and in any linked mate­ri­als, is not intended to be, and should not be con­strued to be, med­ical advice. If you have a med­ical con­cern, con­sult with an appropriately-licensed physi­cian or other health care worker. Never dis­re­gard pro­fes­sional med­ical advice or delay seek­ing it because of some­thing you have read on this blog or in any linked materials.  If you think you may have a med­ical emer­gency, call your doc­tor or 911 immediately. The views expressed on this blog and web­site have no rela­tion to those of any academic, hospital, practice or other insti­tu­tion with which the author is affiliated. Don’t be thick – these are just  suggestions – take care of you!

Boot Camp Week 3 – Five Weeks to Better

If you have been playing along at home, you have probably already started seeing differences in your practice and your playing. I hope this encourages you to keep at it. Consistency may be the most important practice element of all, and it is certainly one of the most underrated!

As before, you can focus on this week’s activities or you can add this on top of the previous weeks – whatever works well for you.*

Stretch – Bow, no, b-o-w! Because so many of us are dedicated (or foolish) we may sit at the harp for long stretches of time. Many do not realize how much work this can be for the hips, back, legs, and core. One soothing, relaxing stretch is to bow. You can do this from the bench or while standing. From the bench, sit away from the harp and with both feet flat on the floor and knees apart (wider than if you were playing), hands resting on your thighs, hinge forward from the hip with your back flat (this is easiest if you keep your head up). Move slowly and deliberately into the stretch. Keep your core strong.  Go as deeply into the stretch as you are able.  Breathe. Now, slowly lower your head, round your back and let your arms dangle. Breathe! You can stay here as long as you like (and as long as you continue to breathe). When you’re ready, s-l-o-w-l-y roll up to your starting position. If you prefer to stand, start with your feet shoulder width apart, weight balanced, knees soft, and hinge forward as above. Be sure to monitor and maintain your balance.

Technique – Ornaments. Sorry, this is not the fun of decorating but the work of adding ornaments to tunes. To practice ornamentation, you need control. To get light, accurate, beautiful ornaments – you must control your fingers and the strings to control the weight and length of the notes. As you know, ornaments are light, quick, and ahead of the beat. To get them light and quick, practice them. Today we are looking at cuts (you can, of course, extend this to other ornaments, but let’s focus here for now). This is a variation of the intervals you did in Boot Camp Week 1. Select your favorite key and scale and work your way, in intervals of a second, from root to octave and back again. Play the first note (the cut) just ahead of the beat with the second note occurring on the beat (because I’m sure you are counting, even if playing scales!). Be careful to work slowly and make the first note light and quick; the second will be heavier and have all the weight of a proper note. Quicklight/HEAVYFULL. When you have it in the right hand (where you are going to use it most) do it in the left hand.  While you might not ever make an ornament in the left hand, practicing that level of control will only serve you well. Once you have that down, move to different intervals (use the 3rd, the 4th, the 5th, etc.) and learn which ones you like best. If some are more challenging than others – well, now you know where you need to direct more work!

Practice Element – Dynamics. Since we’re already working on control – let’s extend that to dynamics. Being in control of the harp gives you a better firmament from which to build more musicality and presentation. Dynamics often get short shrift or just forgotten. Now this might be forgivable (m-i-g-h-t) in a set of dance tunes, it is unforgiveable in songs and airs or any classical music. The dynamics are one of the easiest things you can do to help you sell the story, so they are definitely an important part of playing. The point of injecting dynamics is to enhance the inflection of the tune. Dynamics don’t always have to be dramatic – even small changes really make an impact to your listeners. To start practicing dynamics, first think about the markings for crescendo/decrescendo – a very long arrow – that’s how you want to play. Let’s stick to a major scale and play it with those arrows – start very small and build the sound as you go up to the octave. Each note should be just noticeably louder than the note before. On the way down, do the opposite with each note just noticeably softer than the previous. This week there’s a twofer – after you’ve done those scales, follow it with a three-scale – place your fingers for the scale and play each note three times – p, mf, f (always with the same finger) up the octave and f, mf, p on the way back down. When you’ve mastered one hand, move on to the other, and then do both together – always careful to assure you have the volume you intended. Too easy? This time do the same scale but as you go up play f, mf, p (and when it’s too easy go to four fff, mf, mp, ppp) and come down at p, mf, f (or ppp, mp, mf, fff). Bored? Now play the scales with two hands – play the left hand p and the right hand f, then switch. Be careful but gentle – and do the work you need to do. Soon you’ll have the skill to be as dynamic and dramatic as you wish – for each tune – exactly as you mean to deliver it!

Hang in there – you’re more than half the way there and you’re building a solid practice habit!

*Remember that I’m not that kind of doctor, so please be careful, work within your own abilities (which isn’t to say don’t stretch yourself but also, don’t hurt yourself!). Be careful and only do what you can do. This blog pro­vides gen­eral infor­ma­tion about trying to stay health and other sub­jects related to playing the harp. All the con­tent pro­vided in this blog, and in any linked mate­ri­als, is not intended to be, and should not be con­strued to be, med­ical advice. If you have a med­ical con­cern, con­sult with an appropriately-licensed physi­cian or other health care worker. Never dis­re­gard pro­fes­sional med­ical advice or delay seek­ing it because of some­thing you have read on this blog or in any linked materials. If you think you may have a med­ical emer­gency, call your doc­tor or 911 immediately. The views expressed on this blog and web­site have no rela­tion to those of any academic, hospital, practice or other insti­tu­tion with which the author is affiliated. Don’t be thick – these are just suggestions – take care of you!

Boot Camp Week 2 – Five Weeks to Better

So, you made it through Bootcamp Week One! If you were able to insert this into your practice – good for you! And remember that you are doing it for you, so even if you only get in a couple of days – you’re making a better you!

This week, you can continue the stretch, technique and practice element you learned last week, you can do this week’s set, or you could add them together. It’s up to you! StretchCozy Corner.  Stand with both feet on the floor, weight balanced between them near an “outside corner” (the kind that point at you). You can also use a doorway. Keep yourself lifted, head up, back comfortable and straight, shoulders relaxed. With your arm out to your side, place your forearm on the wall. Slowly draw in a deep breath into your abdomen, hold for a moment and slowly lean into your corner, turn away, and let your breath out. Do this for a couple of breaths, and then do the other side. Be relaxed and be careful to be in control so you don’t hurt your shoulders. Do not stretch farther than your flexibility!*

TechniquePlacing. One challenging thing is to learn to land on strings that are already vibrating so as to stop them, but not too quickly! If you don’t stop the strings, you get horrible buzzes. But if you stop the strings too quickly you get noise. This week, to practice placing, we’re going to use chords. Start in your favorite major key and counting in 3. Wang off a really loud I chord on the 1 beat. Use the second beat to admire your handiwork (or to be slightly more successful, use the time to figure out your next move!). On the third beat, land back on that same chord – quietly, gently but firmly. Watch your fingering and use it for both the first and third beats. Play the chords you are comfortable with. Just beginning? Stick to I-III-V chords. More advanced? Do I-V-VIII chords. Really advanced – do something jazzy – but make sure the third beat is playing the same notes as the first! Work slowly and carefully to assure you’re actually stopping the strings like you mean to (don’t work on luck!). Once you’ve got the hang of it, work your way up the octave repeating the chords. Go slowly and carefully. No buzzing, no misses (errors), stay on the beat, make smooth transitions, and mind your hand and arm position and that your wrists are in a neutral position.  No tension!  Keep your shoulders down and your head up. Start with each hand and when these are good, go on to both hands. If this is too easy, you know the drill – place your hands and then close your eyes. Still too easy? Start with your eyes closed to find the start point. Again, do not accept a marginal effort – “good enough” isn’t. Do the work – for you. Not getting what you expect? Slow down more.  Go only as fast as you can do it correctly.  Do not rush. Remember to enjoy the sound, to feel the harp, and enjoy the experience! This can be difficult, so don’t sweat it if it takes a little practice – you will get there if you keep working on it!

Practice elementReading. This week practice reading. One of the great things about reading is that you can do it anywhere! And if you practice reading enough – when you’re not at the harp, you’ll still be able to “hear” the music in your head as you read. If you’re just learning to read – PLEASE BE KIND TO YOU! Think back to when you learned to read words (or think about a child you have witnessed struggling to learn to read). It was difficult – learning to tell one squiggle from another, and learning what each specific squiggle meant was hard. And you spent a lot of time learning to tell them apart and remembering what they meant – and sounded like. This is just like that! And, if you’ve had some time away from the paper, you might find that you’re a little rusty at reading – and need to “sound out” some of the squiggles. There are a number of ways to practice your reading. For this week, select music that is not familiar, but is at your level of proficiency. Sit at the harp and do-not-play! Rather, glance at the page and randomly select a squiggle.  Then play that squiggle on your harp. The point here is not to learn the piece but rather to practice identifying the squiggles and their meanings. If there are lever (or pedal) changes – touch the appropriate lever. If there’s a middle C indicated, touch the middle C. Don’t just pick the easy ones – if there are ledger lines and you’re not good at that, work on those. Spend time reading the music and identifying where the squiggles go. You can also play the note so you can learn what each squiggle sounds like. If possible, spend 15 minutes each day practicing your reading. With that slow steady approach, you will be able to read more accurately and more quickly. Use your timer to assure you only spend 15 minutes.  By squiggles, I’m sure you know that I mean notes, but also any of the other markings – accidentals, dynamics, key signatures, etc – you need to practice it all to get really smooth.

Keep at it again this week and you will see improvement. If you can practice both week’s activities, you’ll see that last week’s seem much easier this week! Just imagine what’ll happen next week!

*Remember that I’m not that kind of doctor, so please be careful, work within your own abilities (which isn’t to say don’t stretch yourself but also, don’t hurt yourself!). Be careful and only do what you can do. This blog pro­vides gen­eral infor­ma­tion about trying to stay health and other sub­jects related to playing the harp. All the con­tent pro­vided in this blog, and in any linked mate­ri­als, is not intended to be, and should not be con­strued to be, med­ical advice. If you have a med­ical con­cern, con­sult with an appropriately-licensed physi­cian or other health care worker. Never dis­re­gard pro­fes­sional med­ical advice or delay seek­ing it because of some­thing you have read on this blog or in any linked materials. If you think you may have a med­ical emer­gency, call your doc­tor or 911 immediately. The views expressed on this blog and web­site have no rela­tion to those of any academic, hospital, practice or other insti­tu­tion with which the author is affiliated. Don’t be thick – these are just suggestions – take care of you!

Practice Boot Camp – Five weeks to better!

May is the “gateway” month – the last month to prepare for all the summer harp fun you’ve been planning. Workshops, competitions, gatherings, schools – there are so many opportunities to meet new people, learn new music, have more fun. And there are also so many opportunities to hurt yourself – carrying your harp more than usual, straining your brain, working your fingers, arms, back and legs!

So let’s use this month to tune up for the long summer. By building a stronger practice over time, you’ll be able to make more progress in your practice time.  And because you’ll be stronger, you’ll be able to get more from all the events you’ll attend.  Each week we’ll add a new stretch, a technique, and a new practice element focus you can be ready to learn, laugh, and love your harp! Let’s get started*.

StretchBreathing.  Stand with both feet on the floor, weight balanced between them (you can also do this sitting with your weight evenly distributed). Keep yourself lifted, head up, back comfortable and straight, shoulders relaxed. Slowly draw in a deep breath into your abdomen, hold for a moment and then slowly let it out. Do this 5 times. Be relaxed and enjoy the deep breaths.

TechniqueIntervals. Be sure to watch your fingering. Progress, in your favorite key and scale through the second, the third, fourth, fifth, sixth, seventh, octave, ninth, tenth, and back down. Go slowly and carefully. No buzzing, no misses (errors), even pace, smooth transitions, and mind your hand and arm position and that your wrists are in a neutral position.  No tension!  Keep your shoulders down and your head up. Start with each hand and when these are good, go on to both hands. If this is too easy, place your hands and then close your eyes. Still too easy? Start with your eyes closed to find the start point. Do not accept “good enough” – this isn’t for your teacher, this is for you – do your best. Not getting what you expect? Slow down more.  Go only as fast as you can do it correctly.  Do not move faster than you can go accurately, do not rush. Enjoy the beauty of the tones, the feel of the harp against you, the experience of producing amazing sound. And don’t get upset if you can’t do it perfectly – remember – we’re practicing…and you’ll get better with practice!

Practice elementSitting. This week practice approaching the harp and sitting on the bench. Don’t just flop onto the stool! Lower yourself gently and in a controlled manner. No hands. Ensure that you’re sitting up straight and relaxed. Both feet flat on the floor, weight distributed across your hips. No twisted spine. No shoulders around your ears. No wrapping your feet around the legs of the bench. No rolling your hip forward. Now, stand. No hands. Sit and stand five times – slowly, controlled, relaxed. If you’re not able to do this five times, do as many as you can and work your way up. When you’ve done that, reach for the harp and pull it back like you’re just learning – straight toward your nose before pushing it off to your shoulder. Again check your posture. Set your timer for some random number of minutes and begin to play something you know fairly well. When the timer goes off, check your posture and make any needed corrections. Practicing your posture will allow it to become automatic so you don’t have to think about it when you’re playing!

Slow and steady wins the race as they say – if you don’t feel like you are doing well, keep at it for the week – you will see improvement. Next week, we’ll add another stretch, technique and practice element.  Leave a comment and let me know how you get on!

*Remember that I’m not that kind of doctor, so please be careful, work within your own abilities (which isn’t to say don’t stretch yourself but also, don’t hurt yourself!).  Be careful and only do what you can do.  This blog pro­vides gen­eral infor­ma­tion about trying to stay health and other sub­jects related to playing the harp.  All the con­tent pro­vided in this blog, and in any linked mate­ri­als, is not intended to be, and should not be con­strued to be, med­ical advice. If you have a med­ical con­cern, con­sult with an appropriately-licensed physi­cian or other health care worker.  Never dis­re­gard pro­fes­sional med­ical advice or delay seek­ing it because of some­thing you have read on this blog or in any linked materials. If you think you may have a med­ical emer­gency, call your doc­tor or 911 immediately.  The views expressed on this blog and web­site have no rela­tion to those of any academic, hospital, practice or other insti­tu­tion with which the author is affiliated.  Don’t be thick – these are just suggestions – take care of you!