Sneaking up on you?

Sneaking up on you?

When you are practicing (or performing) do you ever get the sensation that something’s not quite right? Like something is sneaking up on you?

I work with a lot of people as a teacher, a workshop presenter, a performer, and as an ergonomist. From my perch I can see it – and you’re probably right. Something is sneaking up on you.

Your shoulders.

Yup, those pesky pendents upon which we are so de-pendent. Literally – our arms hang from our shoulders. Our wrists are (still) at the ends of those arms. And dangling at the end of that chain – our fingers. Yes, our shoulders are pretty important.

But we get busy. There’s all that playing to do. Remembering the notes, forgetting our fingering, finding the right measure we need to be reading, possibly playing faster than we’re ready to. We are focused on a number of (granted, very important) things. And what we don’t have is brain space to focus on is often…our shoulders.

So, they creep up. They’re trying to help, but in their zeal to be supportive, they increase our tension, pull our arms out of their natural (relaxed) posture and requiring more energy to hold our arms, wrists, and fingers in the appropriate place to play the music the way we are wont to. And all of that makes it harder to play, which is distracting – and stressful. You can see how this can easily become a vicious (and possibly viscous) circle.

Stop it. How? you might ask. Well, I’m delighted to share that I have just the thing! Try this:

  1. Record your playing (you knew this would come up). Why? So you can see where and when your shoulders start to travel. This can be as simple as poor posture which you can improve by setting yourself in a good neutral posture from the minute you touch the bench. But what if you’re a stress shrugger? Do your shoulders keep company with your ears when the going gets tough? Well, a video will help you find your triggers.
  2. Once you know what it is that sets your shoulders off, then you can focus on correcting it. Your triggers might be playing faster than you’re ready, coming to a “tricky” part that you’re not really comfortable with yet, or that you’re not breathing, or just not relaxing into your playing. The video will help you find out what is happening – and when – so you can work on it.
  3. Once you know what triggers your shoulders’ to travel, then set a random timer (here’s a free one on the internet and here’s another one) to give you a signal at various times. When it dings, freeze, and check your shoulders. Are they where you’d expect and want them to be? Or did you run out of focus doing other things? Since this is random, it gives you time to stop thinking about your shoulders and the ding serves as a reminder to make sure they are down. If the ding happens and your shoulders are at your ears – don’t stop playing, just drop and relax them and keep going. You want to learn to detect that you’re shrugged and relax.
  4. Breathe! (Do I need to say more than that? I didn’t think so, but I will) Breathe like you mean it since it will not only relax you but also help keep your mind clear and present.
  5. Take breaks throughout your practice. Think about practicing in 20-minute segments (with a timer, because it helps). At the end of each segment, breathe, stretch, move around, get up off the bench, and let your whole system rest for a sec. Then you can come back to the next segment ready to go.
  6. Be kind to yourself. This might take a while. After all, you unknowingly developed the habit of tensing your shoulders and now you will consciously go about undeveloping that habit and learning to be more relaxed. Unlearning (to shrug) and relearning (to relax) takes longer than the initial learning, so be gentle on you – reward yourself for your continued growth. And don’t lose momentum, this is something that will come with time and practice.

It is important to get your shoulders dropped when you’re practicing – if you work in that tension, you will train yourself to play with that tension. You will actually ingrain that stress in your shoulders which, as mentioned above, impacts your playing.

If you’re still Team “I’m not comfortable on video” you can use a full-length mirror – but also, get over yourself, you’re not making a Hollywood extravaganza or even a social media video. You are using a valuable tool to help you grow. Just do it (it’s also faster than using the mirror because you can practice, and then review the video when you’re finished – none of that pesky trying to “catch yourself” while you’re also practicing!

Are your shoulders sneaking up on you? Let me know what you do (or what you’re going to try) – in the comments!

PSST – did you hear the latest?

PSST – did you hear the latest?

Hot off the presses! There’s a new harp in town!

If you have been reading any length of time, you know that I hold my local luthier, Rick Kemper of Sligo Harps, in the greatest esteem. He builds amazing harps, takes impeccable care of all my harps, and teaches me something every time I talk to him (usually about harps, sometimes about curry).

The cool thing – he has designed and built a new harp design. The even cooler thing – you’re the first to read about it as he dished on the new design exclusively with us! He graciously let me play one with it’s rich tone and touchable finish. Yummy!  Even more graciously, he let me ask him some questions.  I’m happy to share our chat:

Rick, what made you decide to develop a new harp design?

It had been a decade since I had fully revisited my Nylon strung designs, and with all the things we have been learning, I decided I should apply those innovations to an updated North American style nylon strung harp.

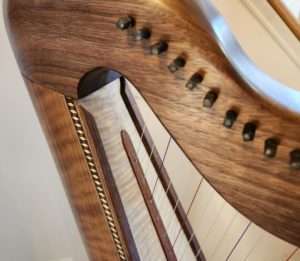
Take a look at the new Elizabeth in walnut

How is it different from your other models?

We sell a lot of Luchairs which are engineered for the Irish and Scottish style of playing. Talking to customers, some want a taller harp with more tension, a more mellow sound. Many customers are wary of the high cost and frequent breakage of Fluorocarbon strings, they have been asking for an updated Sligo harp that uses reasonably priced nylon strings. I’m really happy with the result, happy enough to mothball two older nylon designs.

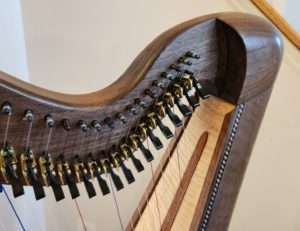
The Elizabeth in Walnut

What is the “secret sauce” of it? Why should people consider this new harp?

I like the idea of “Sligo Secret Sauce” – we really ought to trademark that! I think we excel at hand built wooden harps that are about 20-30% lighter than most others in the class, with build quality and innovations that allow us to warranty them for 10 years.

At Sligo, there is not an upcharge for round backs over square backs or staves – they are all the same price. Round backs are lighter by 2-3 lbs, they never crack and look elegant, so the majority of our customers opt for them. We also use double tapered soundboards, finesse the inner string rib, use a screwed batten trim for the sound board edge – and a dozen other build details that deliver great sound, dynamics, and longevity in Sligo harps. I do a brisk business repairing all kinds of harps, and I don’t want my customers dealing with the same structural issues 7, 10, or even 15 years later with a Sligo instrument.

What sort of people would be attracted to it? Who is this harp for?

Harp Players that are looking for a taller American style harp with a large sound. Ones that find the treble ping of Fluorocarbon strung harps too strident for their taste or want to avoid the more frequent breakage and additional cost of Fluorocarbon. Some players have trouble with the even spacing (4 inches per octave) used on the Luchair. This harp has graduated spacing, what many in the industry call “Concert Spacing”, wider at the bass end narrower at the top.

What are you calling the new model harp?

It is called the Elizabeth. Since October, I have had two brothers apprenticing at the shop once a week for a few hours – home school youth who wanted some lessons in woodworking. I had been ruminating on the parameters of a new design, and proposed they help me build a pair of harps to that end. They seized on that opportunity. When I asked who in this family of 10 was most likely to take up the harp, and they thought that was their sister Elizabeth. The provisional moniker stuck.

How much does it weigh? What are the dimensions?

In Walnut or cherry, it is 20.6 lbs, 53 inches tall, 27 inches deep. When people ask about height, they may be trying to figure if the harp will fit in their car. They may be asking because they want to know how it plays against their body. Will this harp rest on my sternum, or will the knee block be up by my ear? A better gauge for the latter is the height of the knee block off the floor. I call this the playing height, and this harp is 51 inches tall at the knee block.

What type of strings?

21 Nylon strings, 5 Nylon wound over nylon transition strings, and 8 steel core bass wires. Some players find the abrupt sound transition on Scotts/Irish style harps, from heavy monofilament to bass wires unsettling. Those 5 Nylon/Nylon wound strings make it a seamless, gradual transition.

What woods will this harp be available in?

I do a lot of harps in Walnut or Cherry. I am happy to maple, custom wood or woods with fancy figure, harpists just need to ask so we can discuss details and purchasing terms for custom work.

How much will it sell for?

$5,600 with a full set of Camac or Loveland levers, and a Cronkhite soft case.

How long will it take to get one?

I try to stay ahead of demand and have 2-3 harps available at any time. That has been harder to do lately as I have committed to complete a score of major repair jobs for clients from the mid Atlantic to Northeast. I deliver a harp in 2-3 months once a customer orders one. I’ve never thought Sligo customers should wait years and years to get their harps. I’ll bring in additional workers and put in an extra 20-30 hours a week to ensure harps are delivered in a reasonable time.

Can we participate in building one if we want to buy one (like you have with other models)?

I make four slots in my production schedule each year for apprentices to come participate in building a harp. Most applicants fall into two categories:

Some are woodworkers that want to start making their own harps. I’ve had 20 or so over the years. I’m proud to have had Kevin Harrington (Cork, Ireland) and recently Robert O’Connor (County Wexford) through this program. There are a half dozen other active builders (e.g., Tim O’Carroll) that started by building from my plans. I’m a strong believer in open-source practices and my hope is the availability of excellent harps will make for a stronger, more active harp playing community. The goal here is knowledge transfer – share what I have learned from 25 years in the business so they can hit the ground running.

If there are slots left, the second group is musicians that want to participate in the creation of their instrument. We usually write back and forth a bit to make sure our schedules work out and both parties are simpatico with the commitment before beginning their build.

When can we see it?

You can come to the shop in Maryland to try it out today. I will also be at Somerset and expect to have one to show there.

So, there you have it – the latest, newest harp from Sligo Harps! If you’re not nearby, come by to see Rick at Somerset Folk Harp Festival Exhibit Hall!*


*More on Somerset soon – hope you’re coming and participating in my workshops!


Turn it up to 11 – Redux

Turn it up to 11 redux 

Last week we talked about not playing ALAPATT (As Loud As Possible All The Time) and how you can enhance your playing by adding dynamics. How using dynamics help tell the story you mean to tell through your playing. We noted that if you want to be a better harper, you needed to work on dynamics.

Dynamics come from control of your hands and fingers. This control determines how your fingers interact with the strings. Expression (an outcome of dynamics) does not mean to play limply or weakly or barely or badly. Rather, we want the same rich, warm tones you get at full volume, but at different levels of loudness. You can do this!

Remember, this is not about playing louder or softer. Rather, it’s about controlling your fingers on the strings, learning how to get what you seek from the strings based on how you move. It’s a delicate dance between you and the harp strings. In this case – you have to lead! To gain this control, I want to give you some exercises that will allow you to focus on learning to control your dynamics. 

Let’s start by reviewing the dynamic markings. If you’re not familiar with them, they indicate the loudness for a particular section of music. These run from incredibly loud to incredibly soft (but still audible). The word for loud is forte (noted as f) while the word for quiet is piano (noted as p). There is also the range between them, and more letters indicate more (of that). So f is loud (forte), ff (fortissimo) is louder than that, and fff (fortississimo) is even louder still.  Likewise, p (piano) is quiet, pp (pianissimo) is quieter and ppp (pianississimo) is even more quiet, but still heard. Smack in the middle are mf (mezzo forte) and mp (mezzo piano) which are moderately loud or moderately soft.

There are a few exercises you can incorporate into your practice to get better at playing throughout your dynamic range so you can master your fingers and tell the story you want to tell. These exercises are not difficult and a few minutes a day will train your fingers and your brain to work together to get what you want. The focus of the exercises is to build differentiation between ppp and fff with clear progress through pp, p, mp, mf, f, and ff and to be in control of your fingers for each.

In control means that you play what you meant to when you meant to.This requires good technique with placing and closing, so if those are still something that you have to think about, then get that ingrained and then work on this.

Also, this is a relative continuum (meaning there is no absolute “loud” or “soft” only really really loud, really loud, very loud, loud, quiet, quieter, really quiet, and “what?”).

The exercises can be piggybacked onto exercises you’re already doing and I’ll use a scale as the example. I chose the scale because 1. I’m sure you’re already doing scales every day already (right?); 2. Scales are important, safe, and accessible to all levels; 3. You already know them, so you don’t need to spend a lot of cognitive energy on remembering the notes to be played which allows you to focus instead on achieving the dynamics; 4. you’ll quickly know when you don’t get the result you wanted/expected. 

Here goes:

Play one octave scale (up and down) in both hands at fff (as loudly as you can – while maintaining good form while staying in rhythm and tempo).

Now, play one octave scale (up and down) in both hands at ppp (as quietly as you can – while maintaining good form while staying in rhythm and tempo).

Third, play one octave scale (up and down) in both hands starting at fff, then repeat the scale each time starting at a progressively quieter dynamic (so fff, then ff, then f, mf, mp, p, pp, ppp. Each time through is a different dynamic). Yes, that is 8 times through the scales with graduated volume.

Next, play one octave scale (up and down) in both hands starting at fff, and subtly shift through fff to ff to f to mf. This takes a little planning – decide before you start to play where you make the shift – and how you will do that! Move it around a little and have some fun. For instance, you might do most of the scale fff and “downshift” to mp in the last 3 notes. Or play every two notes at a particular level. It’s up to you – the important thing is, did you get what that you expected? Don’t forget to do the other side and play your one octave scale (up and down) in both hands starting at ppp, and subtly shift through pp to p to mp.

Once those are easy(er), you can really shake it up.  Rather than moving gradually from one dynamic to the next, adjacent dynamic, make big leaps!  Maybe go ppp to ff to mp to fff, etc.  You get the idea – big changes…just like you’re playing music!

Go slowly and carefully at first. Each time you learn something new you need to give yourself time to process it, think about what you’re doing, what’s working (and not working), make changes, experiment, and learn. Give yourself time for all that! Make your own variations – rather than playing both hands together play from one to the other (for example – fff from left hand up an octave to right hand for another octave and down at ppp or something else that challenges you a little bit but doesn’t stop you from learning).

When you are able to successfully do each of these, then do the same exercises but make the movement between loudnesses larger across multiple octaves. At first make really big adjustments from fff to ppp at the crossover or vice versa. Change up which direction you go (loud to quiet or quiet to loud). The point is to test your control (and decision making).

Just about the time you think you’re big and bad and hard to diaper, it’s time to do the really challenging exercise. Because real control will be having different dynamics in each hand – a quiet base line under a loud melody. Or a shift of the melody to the lower register (and in the left hand) with a quiet harmony in the right hand. Remember the idea is to control your hands and make good decisions.

Here we go – Play the bottom of the octave only (e.g., C-D-E-F (up to but not through the cross) in each hand. Select which hand will play fff and which will play ppp. Give it a go. Now, this is much like when you first tried contrary motion – you might feel like your fingers are connected to someone else’s brain! Just breathe and keep on. You want to have each hand doing its thing (now you see why you have to practice!). And when you are feeling pretty confident on this, then do the whole octave up and down.

If it doesn’t seem to be coming along, try letting one hand come ever so slightly before the other so that you’re in control of each finger. Breathe. Relax. Work them closer and closer together until they’re simultaneous. This is hard – don’t rush it. When you think you have it – make a video to assure that you’re not getting tense (and that you’re keeping the dynamic distinction between hands consistent).

Important things to keep in mind (especially when it isn’t going swimmingly):

  • Progress not perfection.
  • This is about control not volume.
  • Whatever leaves you thinking you’ve had enough and can probably get by without is exactly what you most need to work on.
  • It will be worth it – when you bring tears to a listener’s eyes…and they’re not from painful eardrums!

Remember that even fast tunes have a story (of some sort). If you want to tell the story of a frenetic rave + chase scene from a video game, then by all means, keep thrashing away. But if you’d like to tell a more subtle story (Battle of the Somme or Flowers of the Forest anyone?) use your dynamics and tell it!

I’d love to hear how you get on with this – let me know in the comments! If, after reading this, you are a little lost, let me know that too – and we’ll work on it. And if you have other approaches, let me know!

Turn it up to 11

Turn it up to 11

Did you know there are apparently four musics of the harp? They are Goiltai (for crying), Geantrai (for cheering), Suantrai (for sleeping), and Thrashai (for being heard over any other sounds present on the earth). (ok, I might have made up that last one)

Have you ever noticed how many people play their harps like they are auditioning for the Scorpions or MegaDeath? It seems as if playing as loudly as possible is their only goal. Now, I get it. You sit behind the instrument, and it is designed to project in front of you so you really might not be able to hear how loudly you’re playing. And if you sit in enough sessions between the other instruments, you could be forgiven for thinking that thrashing away at the strings is the best possible way to get out there.

But ugh – stop! Whacking away at your poor strings is not what you need to get better at. If you really want to join a death metal band, buy an (really big) amp.

If you want to be a better harper, work on dynamics.

Dynamics are an easy way to differentiate your playing, bring musicality to your music, and help your audience to know which of the three musics you’re trying to convey. Dynamics allow you to play at varying loudnesses. There are two major parts of adding dynamics to your tunes – storytelling and technique. Let’s start with the easy one this week.

Storytelling is essential to your playing. Remember that when you play, you are communicating with your listener (even if the only listener is you). For each tune, you’re telling a story. For many laments, airs, and songs there is a specific related story or tale. For others there isn’t (or the story has been lost, or you just haven’t heard it). When you play, you’re going to tell a story – whether you mean to or not. Might as well tell the story you mean to (even if you have to make it up).

The story you convey will be put forth on the tune and will be told through the tempo, the rhythm, the accompaniment, and the dynamics! So having some (dynamics) is a great place to start. If you doubt what I’ve said, I refer you to Prokofiev’s Peter and Wolf a very easy example of this point.  But also, Holst’s The Planets or Tchaikovsky’s 1812 Overture * or Muse’s Uprising as other easy examples. **  When you listen to these pieces you can quickly hear how much the dynamics support the story being told.

You can do that!

When you’re preparing a piece of music, think about the story you want to tell and how your dynamics will help you tell it.

How? (you already know what I’m going to say….)  The way to get better at varying dynamics is to practice. Next week, I’ll share some exercises you can incorporate into your practice to develop your dynamics!

If you have tips or tricks for playing dynamically, I’d love to hear them – let me know in the comments!